Thursday, April 21, 2011

Last shibori class ;-(

So our class is coming to an end...I have really enjoyed working with the colorhue dyes...I enjoy the fact that as far as dyeing fabric they are a clean process ;-) and quick set so no steaming or special process to complete after adding color to the silks...One drawback is the color is not as intense or deep as other fiber active dyes.
I have enjoyed using them for this class and actually intend to continue using them in future creations.
So for this final lesson it was suggested we should try to be creative and be open to new ways to create texture or resists in our dyeing.  I happened to have sitting in my studio the sink tool that our teacher demonstrated a technique on so decided "heck why not give it a try"...

so getting ready to add more dye
clamping technique
 
stitching and tie resist
clamping sample, intend to over dye after adding stitching

3 different scarves, resist by stitching
(orange scarf used kitchen sink tool and stitching to create resist design and texture)
 
close up on the one scarf, different types of stitching, color hue  dyes
The class was GREAT! I look forward to creating more shibori....eventually with other dyes.

Thursday, April 14, 2011

Lesson four was Arashi Shibori

So it might have taken me two times to get the effect correctly but here it seems to be....Arashi translates to "storm-driven rain" . Since the teacher of my online class mentioned that she has personally wrapped over 80,000 yards of strings around poles and stated that easily the first 20,000 were kinda iffy I realize it would take me forever to master the technique. I wrapped 3 scarves so far and this was the first one to give an inkling of the arashi pattern from what I have seen.
So to try to show you a little of the process:
pole wrapped silk-dyed with colorhue dyes


Arashi Shibori silk scarf
Close up
 I am really enjoying my online class, highly recommend the class to all.
Glennis Dolce - Shibori Girl Studios @ www.shiborigirlstudios.com

Tuesday, April 12, 2011

It's been a time of Bluebells and silk dyeing ;-)

So it's bluebell time in VA ;-) last year was the first time the hubby and I discovered these flowers which make the ground look totally awash in lavender color...they are a very short seasonal joy so we took the time and made sure to as they say "take time to smell the flowers"


The other item I've been busy with lately is continuing working on discovering more about Color-hue dyes on silk...
here are my newest creations...


Wish my photography of the silk scarves could do them justice... ;-)))

Friday, April 8, 2011

Figure it's safe to finally blog about.

You might recall back in January I decided to set some new goals for 2011. 
Goals are to: Sign up for quilting swaps (possibly found online), to participate in  quilt a-longs (possibly found online) or w/ guilds and to enter quilt challenges.
Well sometime during January I came across this challenge on the Modern Quilt Guild's website. [ the modern quilt guild - challenge-2
 I was excited because the timing seemed perfect. Seeing the challenge was to create a monochromatic quilt also worked well with another goal of mine; to use from my stash as much as possible. My first step was to look through my stash to try to decide on a color, this could prove difficult since I’ve never met a color I don’t enjoy. Since Jan–March can sometimes be a rough time of the year due to seasonal snow storms it made me think of blue. Blue would be my choice,  I would call it Winter Blues.
Once my color choice was made; it was now time to begin the challenge.
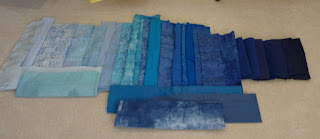
I gathered blues from my stash placing them in piles by value sorting out blues I felt did not seem to fit. I left the blues sitting spread out in a row for about a week weeding to and from the stack while I let my thoughts go to brainstorming a design. Traditional log cabin popped in and out along with other traditional patterns but in the end I decided to just gather my fabrics, cut some selvage to selvage strips and begin to sew them together into groups of  3 or 4 usually groups of dark and light value along with wide and thin strips.

After ironing the strips (new fabrics) I cut them up into various size shapes (rectangles and squares) and began a composition on my design wall. 
After piecing the main rectangle design together I decided to complet the quilt top by adding a border. The border of my quilt was the toughest design step for me, it took the longest for me to create. I seemed to have a problem with overkill ;-) 
Can you say OVERKILL?
in the end after stepping away from my quilt for a few days I came up with a solution I felt worked for a border.


I did post some photos back when I was working on the project, yet did not explain the quilt or why I had chosen to create a monochromatic quilt.  I then realized I probably should NOT be posting or share my entry till After the challenge deadline had passed. 
I completed the quilt and sent it off as entry. Just this past week I've noticed at least one other quilter blogging about their entry  so figure it might be okay to now share my entry  completed for The Modern Quilt Guild Challenge Two - 'my first online challenge' "Winter Blues" Quilt.

My completed monochromatic quilt "Winter Blues"
close up of Winter Blues
I am happy with my monochromatic quilt “Winter Blues” AND  I look forward to attempting more challenges in the future.
I also can't wait to view all the entries when they are posted to see the many ways 'we quilters' deciphered make a quilt that is monochromatic. ;-)

Thursday, April 7, 2011

Arashi Shibori! Lesson 4 ;-)

I am continuing with my "shibori w/ silk" lessons and have been enjoying the various exercises using color-hue dyes w/silk and various shibori techniques.
I ordered about 9 different styles of silk scarves from Dharma Trading Company to use for my class lessons. My goal in ordering the various scarves was to help me try to experiment with as many different types of silks as possible. I have silk habotai, silk charmeuse, chiffon, crepe de chine and a silk/wool blend. The trick now for me is to try to remember which silk is which. ;-)
This week's technique was Arashi Shibori (pole wrapping); I have done some pole wrapping in the past using cotton fabrics and indigo dyes so I feel a little comfortable with the process of wrapping fabric on a pole, the part that was completely to me is once again was the use of quick set dyes and how they would react during the process.
base color dyeing


wrapping silk on pole

dyeing wrapped silk scarves
drying

Saturday, April 2, 2011

More silk dyeing & shibori pattern stitching - class lesson

This past week in the evenings while sitting in front of the boob tube with the hubby I have been working on stitching shibori patterns on a couple silk scarves.

this scarf is 63% silk & 37% wool


this scarf is 100% silk

After the stitching is completed you then pull the threads tightly before completing the dyeing process.
I lightly dyed the one green and one beige before pulling threads 
 The next step of the shibori process is to dye the silk. I am learning how to dye silk with color hue dyes, which I am learning quickly why they are called instant liquid dyes for silk,linen,rayon & wool. colorhuedye.com
attempted to stick with earth tone colors

tried to think blues,greens,violets
After dyeing the silk, you rinse well then let them dry.

Scarves are dry next step is to remove the threads.

I consider my lesson a success, I love how the one scarf turned out, in fact I would like to say it turned out close to what I was hoping or planned as much as shibori let's you control. I consider the second scarf a semi disaster or maybe I should just say it was an opportunity to learn ;-) I learned a little more about what quick set dyes are and how they can react on the silk. I imagined that since we work with the silk wet that the dyes would blend or mix to create new color shades on the wet fabric;  such as putting yellow on wet blue silk would turn green but as you might be able to notice from my photos the colors set as blotches of various color versus blending into mixed colors. In other words I will mix my colors before applying them next time and see if that works as planned. ;-)


I look forward to completing my next shibori class lesson.